This Post may contain affiliate links, when you purchase through links on our site, we may earn an affiliate commission at no extra cost to you. Here’s how it works.
Dolby Atmos, renowned for its immersive audio experience, has revolutionized how we perceive sound in our multimedia applications.
Table of Contents
ToggleIt’s no longer just about left, right, or center channels; Dolby Atmos encompasses a 360-degree soundscape, creating a more realistic and engaging experience for users.
In this article, we’ll explore how to enable Dolby Atmos Windows 11, ensuring that your system is optimized for the best audio experience.
Follow These Steps To Enable Dolby Atmos On Windows 11
The following steps can clear all your doubts about the working process of Dolby atmos on windows 11.
Step 1: Check Your Hardware Compatibility
Before diving into the software aspect, it’s crucial to ensure your hardware is compatible with Dolby Atmos. This includes checking your speakers and headphones to see if they support Dolby Atmos. Many modern high-end audio devices do, but it’s always good to confirm by checking the product specifications.
Step 2: Update Your Windows 11
To avoid any compatibility issues:
- Make sure your Windows 11 is updated to the latest version.
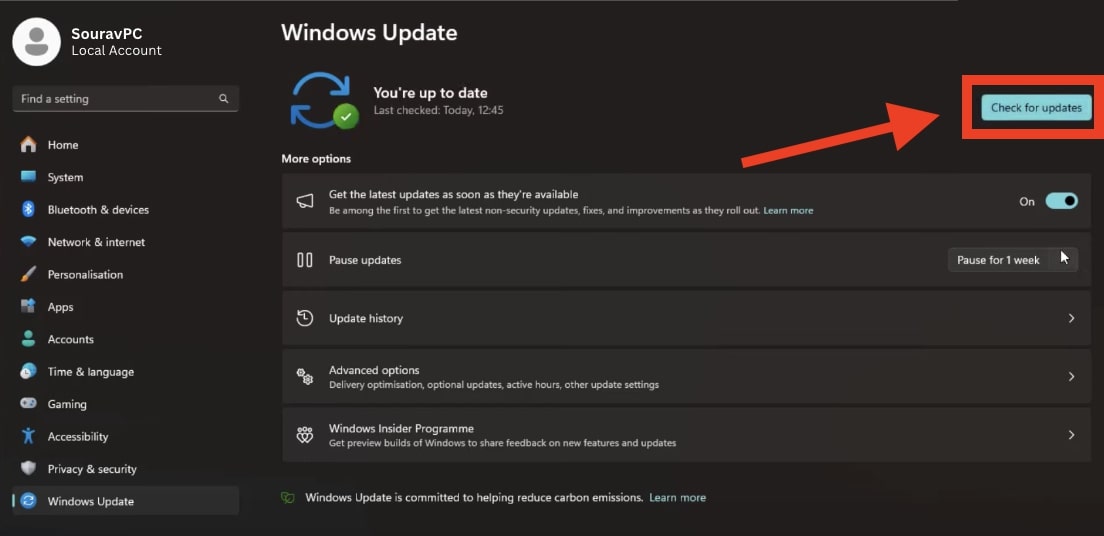
- Go to ‘Settings’ > ‘Update & Security’ and click on ‘Check for updates’.
- Install any available updates to ensure your system is up-to-date.

Step 3: Install Dolby Access App
Dolby Atmos functionality on Windows 11 is managed through the Dolby Access app. To install it:
- Open the Microsoft Store on your Windows 11.
- Search for ‘Dolby Access’ and select the app from the search results.
- Click on the ‘Get’ button to download and install the application.

Step4: Adjust Sound Settings in Windows 11
After configuring Dolby Atmos in the Dolby Access app, you need to set it as the default in Windows Sound settings.
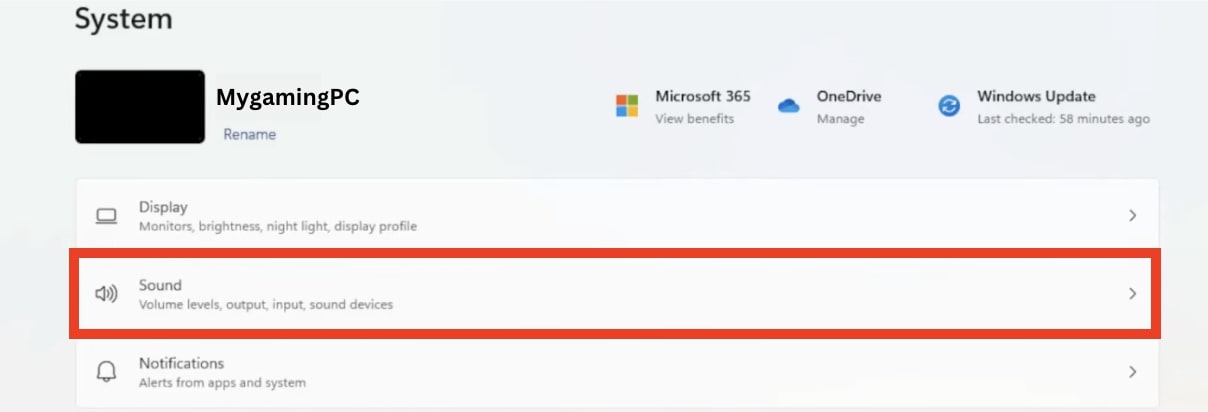
- Right-click on the speaker icon in your system tray and select ‘Sounds’.

- Scroll down and under the Advance click “More Sound setting”

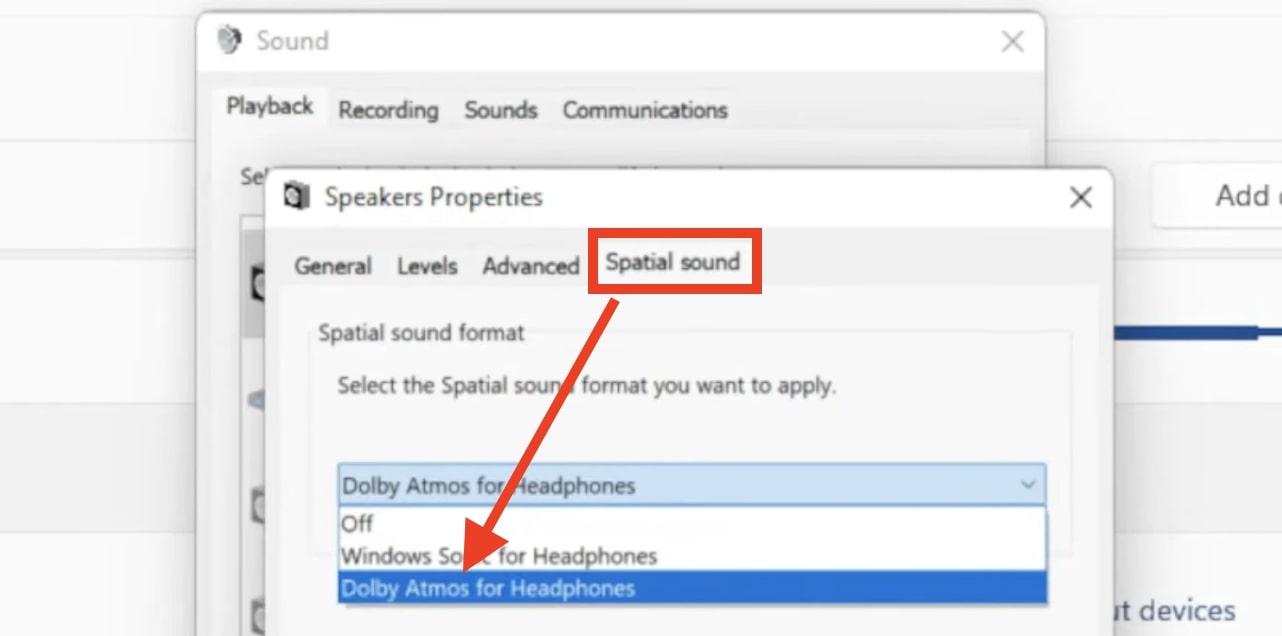
- In the Playback tab, find your audio device and click on ‘Properties’.
- Under the ‘Spatial sound’ tab, select ‘Dolby Atmos for Headphones’ from the dropdown menu.

- Click ‘Apply’ and then ‘OK’ to confirm your settings.
Step 5: Configure Dolby Atmos
Once Dolby Access is installed, open the app, and you’ll be guided through setting up Dolby Atmos. Follow these steps:
- In the Dolby Access app, go to the ‘Products’ tab.
- Here, you can choose between setting up Atmos for headphones or a home theater.
- Follow the on-screen instructions to configure your setup.
Step 6: Customize Your Experience
Dolby Access offers various settings to customize your audio experience.
Explore the ‘Personalize your experience’ section in the Dolby Access app to adjust equalizer settings, choose different sound profiles, and more based on your preferences.
Troubleshooting: Windows 11 Dolby Atmos Not Working
Occasionally, you might encounter issues where Dolby Atmos does not work as expected on Windows 11.
Here are some steps to troubleshoot this problem:
- Check Audio Device Compatibility: Ensure that your audio device supports Dolby Atmos. Not all audio hardware is compatible, and this is a common oversight.
- Update Audio Drivers: Outdated or corrupted audio drivers can lead to issues. Update your audio drivers by going to ‘Device Manager’ > ‘Sound, video, and game controllers’. Right-click on your audio device and select ‘Update driver’.
- Reinstall Dolby Access App: Sometimes, the Dolby Access app might malfunction. Uninstall it from the ‘Apps & Features’ section in Settings, and then reinstall it from the Microsoft Store.
- Check Audio Configuration: Ensure that your speaker or headphone configuration in Windows is correctly set. For instance, setting it to a 7.1 configuration when you have a stereo setup can cause problems.
- Disable Audio Enhancements: Sometimes other audio enhancements can interfere with Dolby Atmos. Disable them by going to ‘Sound’ settings, selecting your device, and under the ‘Advanced’ tab, unchecking ‘Enable audio enhancements’.
- Windows Update: Ensure your Windows 11 is fully updated as some updates contain fixes for known issues.
If these steps don’t resolve the issue, consider seeking support from the device manufacturer or Microsoft support.
How to Disable Dolby Atmos on Windows 11
If you wish to disable Dolby Atmos on your Windows 11 system, follow these steps:
- Via Dolby Access App:
- Open the Dolby Access app.
- Go to the ‘Products’ tab.
- Select the configured device (headphones or home theater).
- Choose ‘Off’ or select a different spatial sound format.
- Via Windows Sound Settings:
- Right-click on the speaker icon in the system tray and select ‘Sounds’.
- Go to the ‘Playback’ tab and select your audio device.
- Click on ‘Properties’, then go to the ‘Spatial sound’ tab.
- In the dropdown menu, select ‘Off’ or choose another spatial sound option.
- Click ‘Apply’ and then ‘OK’.
Disabling Dolby Atmos will revert your audio settings to the default format. You can always re-enable it following the steps outlined in the earlier sections of this article.
Configuring Audio Settings for Optimal Dolby Atmos Experience
Adjusting Sound Settings for Movies, Music, and Gaming:
- Movies: To get the most out of Dolby Atmos in movies, it’s essential to adjust the audio settings to match the cinematic experience. This includes enhancing the surround sound effect and ensuring dialogue clarity. In the Dolby Access app, select the ‘Movie’ mode to optimize the audio for cinematic content.
- Music: For music, the focus shifts to clarity, depth, and stereo separation. The ‘Music’ mode in Dolby Atmos settings can enhance these aspects, providing a more immersive and rich listening experience.
- Gaming: For gamers, positional audio can be crucial. The ‘Game’ mode in Dolby Atmos settings helps in accurately positioning sound in a 3D space, enhancing the gaming experience by providing a more realistic and immersive sound environment.
Tips for Optimizing Speaker or Headphone Setup:
- Speaker Setup: Ensure that your speakers are correctly positioned according to Dolby Atmos specifications. This might include adding overhead speakers or enabling up-firing speakers for the full effect.
- Headphone Optimization: When using headphones, enable the Dolby Atmos for Headphones feature. This simulates the Atmos experience through any pair of stereo headphones, adjusting the audio to create a virtual surround sound environment.
Conclusion:
Enabling Dolby Atmos on Windows 11 can significantly enhance your audio experience, whether you’re watching movies, playing games, or listening to music.
The immersive sound technology brings depth and clarity to audio that traditional stereo systems can’t match.
To learn how to enable Dolby Atmos on Windows 11, you can follow these steps to unlock a new dimension of sound on your Windows 11 device.
Remember, the quality of your audio hardware also plays a crucial role in the experience, so consider investing in good quality Dolby Atmos compatible headphones or speakers for the best results.
