

This Post may contain affiliate links, when you purchase through links on our site, we may earn an affiliate commission at no extra cost to you. Here’s how it works.
Connecting a surround sound system to your TV can significantly enhance your home entertainment experience, allowing you to immerse yourself in high-quality audio that complements the visual elements of movies, TV shows, and video games.
Table of Contents
ToggleThe process involves several steps, from choosing the right equipment to setting up and optimizing the system.
In this article, we’ll guide you through the essentials of how to connect surround sound to TV.
Steps on How To Connect Surround Sound To TV?
Following steps gonna helps you to connect your tv with surround sound system.
Step 1: Choose Your Surround Sound System
Before connecting anything, you need to decide on the type of surround sound system that best suits your needs.
Surround sound systems come in various configurations, such as 5.1, 7.1, or even Dolby Atmos setups, where the first number represents the number of speakers and the second number refers to the subwoofers.
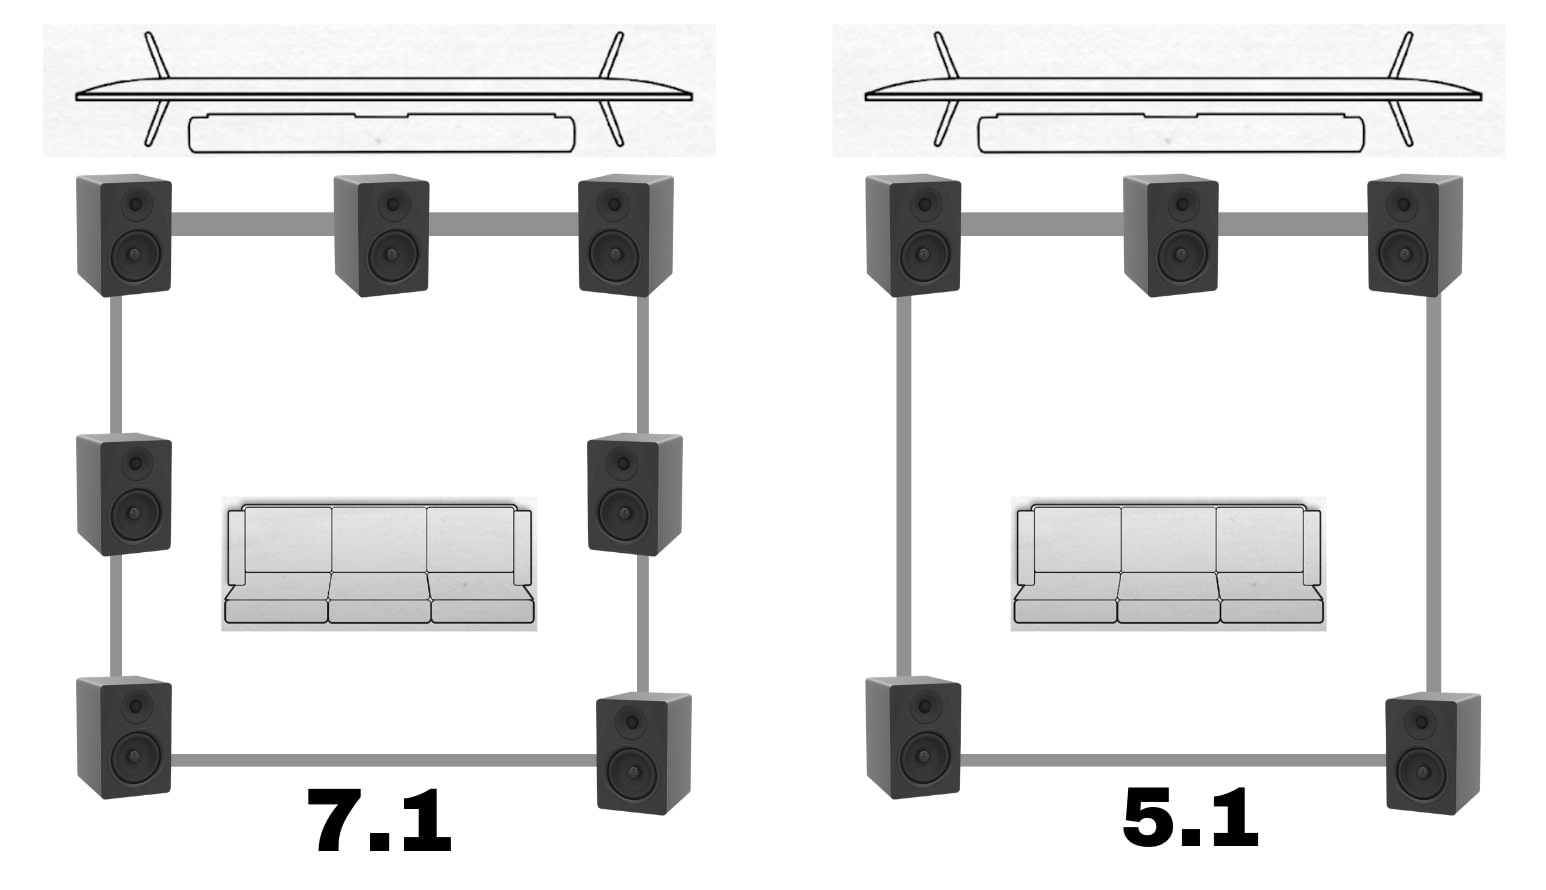
A 5.1 system, for example, includes five speakers (front left, center, front right, rear left, and rear right) plus a subwoofer.
Step 2: Check Your TV’s Connectivity Options
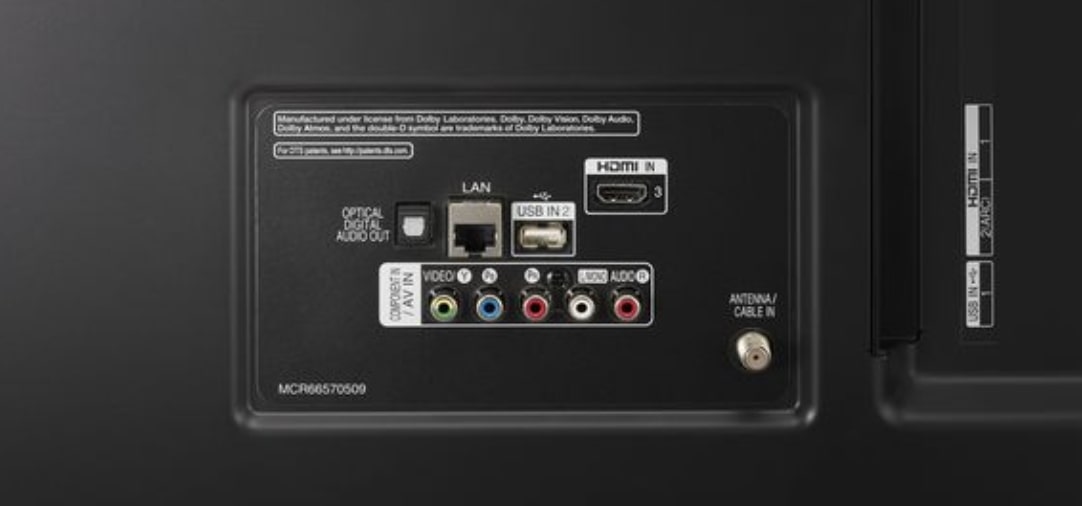
Examine your TV to identify available output ports.
Common connectivity options include HDMI (ARC), optical (TOSLINK), and RCA. HDMI ARC (Audio Return Channel) is preferred for its ability to handle high-quality audio and simplify connections by using a single cable for both audio and video signals.
Step 3: Connect Your Surround Sound System to Your TV
HDMI ARC Connection:
- Locate the HDMI ARC port on both your TV and surround sound receiver or soundbar.
- Use an HDMI cable to connect the two HDMI ARC ports. This connection allows the TV to send audio back to the surround sound system.
Optical Connection:
- Find the optical output on your TV and the optical input on your receiver or soundbar.
- Connect them using an optical cable. Note that while optical supports many surround sound formats, it might not support the latest ones like Dolby Atmos.
RCA Connection:
- Identify the RCA audio output on your TV and the RCA audio input on your surround sound system.
- Use an RCA cable to connect these ports. RCA connections are typically used for stereo sound, but they can still be a viable option if other connections aren’t available.
Step 4: Configure Your TV’s Audio Settings
After establishing the physical connection, adjust your TV’s audio output settings to ensure it’s correctly configured to use the external surround sound system.
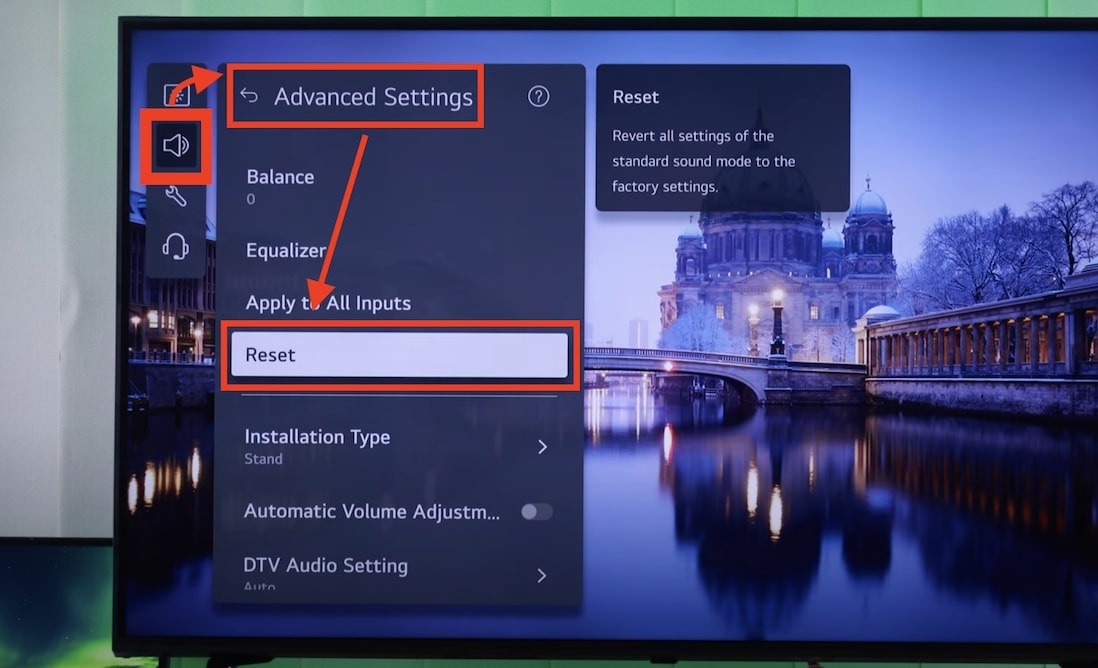
Navigate to your TV’s audio settings menu and select the appropriate audio output (e.g., HDMI ARC, optical).
You may also need to disable the TV’s internal speakers.
Step 5: Set Up Your Surround Sound System
Position your speakers according to the system’s layout (5.1, 7.1, etc.). Ideally, place the center speaker above or below the TV, the front speakers to the sides of the TV, and the rear speakers behind the listening area.
The subwoofer can be placed on the floor, preferably in a corner to enhance bass response.
Step 6: Calibrate Your Surround Sound System
Many surround sound receivers come with a calibration microphone.
Use this microphone to automatically adjust the speaker levels and distances, ensuring optimal sound quality.
If your system doesn’t include a calibration tool, you can manually adjust the speaker settings through the receiver’s menu.
Step 7: Test Your Surround Sound System
Play a movie or TV show known for its dynamic sound to test the surround sound system.
Listen for clear dialog from the center speaker, immersive environmental sounds from the rear speakers, and deep bass from the subwoofer.
Adjust the speaker levels if necessary to balance the audio.
How to Connect Surround Sound to TV with HDMI?
If you are planning to set surround sound to TV with HDMI, follow this brief guide on how to do it:
- Identify HDMI ARC Ports: First, locate the HDMI ARC port on your TV and your surround sound receiver or soundbar. HDMI ARC ports are usually clearly labelled.
- Connect with an HDMI Cable: Use a high-speed HDMI cable to connect the HDMI ARC port on your TV to the HDMI ARC port on your receiver or soundbar.
- Configure TV Sound Settings: On your TV, navigate to the sound settings and set the audio output to HDMI ARC. This step will ensure that the TV sends audio signals to your surround sound system instead of playing them through its internal speakers.
- Enable CEC Functionality (Optional): Consumer Electronics Control (CEC) allows you to control the volume and power of your surround sound system using your TV’s remote control. Enable CEC in your TV and sound system settings for added convenience.
- Test the Setup: Play a video or audio track to test the surround sound system. You should hear the audio coming through your surround sound speakers, providing a more immersive experience.
How To Connect Surround Sound To TV Without HDMI?
There are a couple of ways to connect surround sound to your TV without HDMI:
1. Identify Audio Outputs on Your TV:
Look for non-HDMI audio outputs on your TV, such as Optical (TOSLINK), RCA (Composite Audio Out), or a 3.5mm headphone jack.
2. Choose the Best Audio Connection:
Select the highest quality connection that both your TV and surround sound system support. Optical is preferred for digital sound, followed by RCA for analog, and 3.5mm as a last resort
3. Connect the Devices:
- For Optical: Connect an optical cable from the TV’s optical out to the surround system’s optical in.
- For RCA: Use RCA cables to connect the TV’s audio out to the system’s audio in.
- For 3.5mm: If necessary, use a 3.5mm to RCA cable or a direct 3.5mm cable, depending on your system’s input options.
4. Adjust TV Audio Output Settings:
In your TV’s audio settings, select the output type you’re using (optical, RCA, or headphone out) and ensure the TV speakers are set to external or off.
5. Test and Tweak:
Play audio through your TV to test the surround sound system. Make volume or balance adjustments as needed for optimal sound.
How To Connect Surround Sound To TV With Optical Cable?
Connecting your surround sound system to your TV using an optical cable, also known as a TOSLINK cable, is a straightforward process that enables you to enjoy high-quality digital audio.
Here’s a brief guide on how to do it:
- Locate the Optical Ports: First, find the optical (TOSLINK) output port on your TV. It’s usually labeled as “Digital Audio Out (Optical)” or similar. Then, locate the corresponding optical input port on your surround sound receiver or soundbar.
- Connect the Optical Cable: Insert one end of the optical cable into the TV’s output port and the other end into the receiver or soundbar’s input port. Make sure the connections are secure, as optical cables use a unique connector that must be fully inserted.
- Configure TV Audio Settings: Go to your TV’s audio settings menu. Look for an option that allows you to select the audio output type and choose “Optical,” “Digital Audio Out,” or a similar setting. This step ensures that the TV directs audio signals to the optical output instead of its internal speakers or another output.
- Adjust Surround Sound Settings: On your surround sound system, select the appropriate input source to which the optical cable is connected. You may need to consult your system’s manual to understand how to switch to the correct input.
- Test the Connection: Finally, test the audio connection by playing a movie or music. Ensure that the sound is transmitted through your surround sound system and that all speakers are functioning properly.
Conclusion
Learning how to connect surround sound to your TV can transform your living room into a personal theater.
By carefully selecting the right equipment, establishing the connection, and fine-tuning the settings, you can achieve an immersive audio experience that greatly enhances your enjoyment of all forms of media.
With a bit of patience and attention to detail, you’ll be able to enjoy cinema-quality sound from the comfort of your home.