
This Post may contain affiliate links, when you purchase through links on our site, we may earn an affiliate commission at no extra cost to you. Here’s how it works.
Creating the right acoustic environment in your studio can make a huge difference in recording, mixing, and critical listening. Don’t worry—there are a few simple and effective ways to treat your space, with a low budget.
Table of Contents
ToggleYou have to identify the issues you have, only installing absorber panels all around the studio may not give you a proper solution.
Improve your studio’s sound by treating early reflections with panels on side walls and ceiling, controlling reverb with rear wall and ceiling panels, and managing bass response with corner bass traps.
Effective Acoustic Treatment Plans
To solve your acoustic problem you can follow provides steps below. Here we identified every issue and listed probable solutions.
Step 1: Address Early Reflections
When sound leaves your speakers, it doesn’t just travel directly to your ears. It bounces off walls, ceilings, and floors before reaching your listening position, creating early reflections. These reflections can cause phase interference, muddling the sound.
How to Tackle Early Reflections:
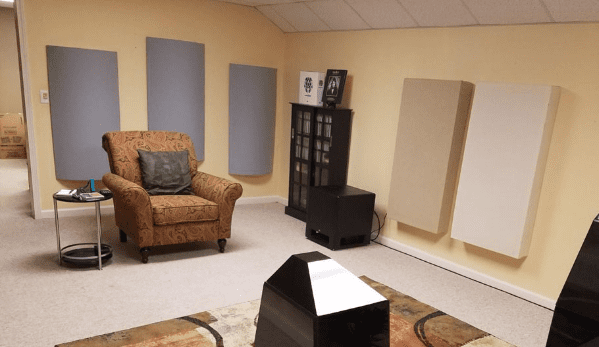
Start by placing absorptive panels where these reflections are strongest. Find out the key spots where sound is bouncing off walls, the ceiling, and the floor. The goal is to reduce reflections from surfaces.
- Use a Mirror: Place a mirror along the walls and ceiling while sitting in your listening position. Wherever you can see the speakers in the mirror, that’s where you should put a panel.
- Panel Placement: For a typical room, place bass traps on the side walls and ceiling, as these areas create some of the most problematic reflections. For instance, two Monster Bass Traps on each side and three on the ceiling can make a noticeable difference.
- Consider Panel Thickness: The thicker panel is better to handle lower frequencies. Use thicker panels (like 7-10 inches) for side walls and ceiling to help with a broader frequency range.
Tip: First Reflection Point – Focus on side walls and ceiling, especially if you are doing mixing or producing.
Step 2: Control Reverb Time
Once you’ve tackled early reflections, you’ll still have longer, later reflections that can cause excess reverberation, making it harder to judge your mixes or recordings. Too much reverb in the room can blur your perception of clarity and balance in the music.
It can also cause problems when recording instruments or vocals, making them sound distant or muddy.
How to Control Reverb:
The goal is to absorb some reflections later in the sound’s journey while preserving a natural reverb that enhances your space. This is where controlling reverberation time comes in.
- Use 242 and 244 Panels: These panels are ideal for controlling reverb. Place them in the rear half of the room and on the ceiling to reduce excessive reflection.
- Balance is Key: Remember, you don’t want a completely “dead” room. A balance between absorption and diffusion is known as sweet spot.
Tip: Diffusion – For some spaces, adding a diffuser (a panel that scatters sound in all directions) can help maintain a sense of space while reducing reverb.
Step 3: Tackle Bass Response
Bass frequencies are typically the hardest to manage in a room. This is especially true in smaller, rectangular rooms.
How to Handle Bass Response:
Bass frequencies are much lower in pitch, meaning they have longer wave lengths and need deeper treatment to absorb properly. Simply adding more panels won’t cut it, focus on areas where the pressure from bass waves is the most intense.
- Bass Traps in Corners: Bass tends to accumulate in corners. Placing soffit traps is one of the most effective ways to absorb low-end energy.
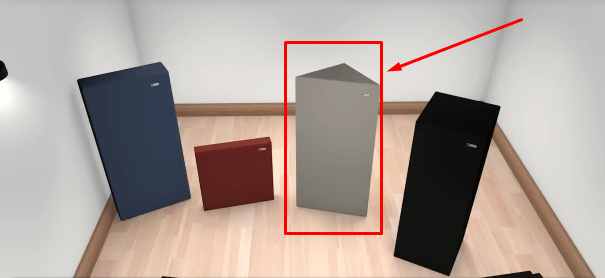
- Pressure Absorbers: To target low frequencies more effectively, you can use pressure absorption panels, which are specifically designed to absorb energy at certain low frequencies.
Tips: Low-Frequency Control – Don’t forget the front and rear walls. These surfaces can also create strong reflections that affect the bass response.
Additional Acoustic Treatment Strategies
Now that we’ve covered the basics, here are some other practical approaches that can help optimize your studio’s acoustics:
Use a Bass Management System (Subwoofer Treatment)
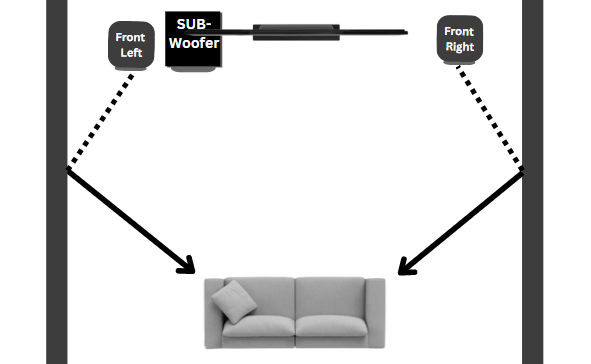
If you’re using a subwoofer, integrating bass management into your room’s treatment plan is critical. Subwoofers can generate low-frequency peaks and dips.
- Place the Subwoofer in the Sweet Spot: Experiment with subwoofer placement to avoid bass buildup in certain areas. The optimal placement is usually near the wall (Make sure not to attach to the wall).
- Use a High-Pass Filter: A high-pass filter can send higher frequencies to your main speakers while only sending the low-end frequencies to the subwoofer. This helps reduce the strain on your speakers.
Add Acoustic Baffles and Clouds
For larger rooms or rooms with high ceilings, you might experience a flutter echo. Installing acoustic baffles or clouds can break up these echoes and improve clarity.
Consider Room Calibration Software
If your room is already treated but you’re still having trouble with certain frequencies, room calibration software can help you fine-tune the acoustics. These tools analyze your room’s response and suggest changes to speaker placement or additional treatment to perfect your setup.
Hire Acoustic Professional:
If you don’t have much knowledge of it, hiring a professional can be a good option. Your small mistakes and unwanted buying things can make your studio more costly and disastrous. Before making any decision, consult with studio building professionals. They may charge a few hundred dollars but you can save more than your unnecessary investment on acoustic treatment or full setup.
Make your own Acoustic Panels.
If you have a very low budget and want to build an Acoustic panel, it’s not a bad idea at all. This may take a few times but it can be worth it. An acoustic panel will cost you anywhere between $50 and $500, but you can do it under $30. In some cases, it will go lower than you think.
Conclusion:
By tackling early reflections, controlling reverb time, and addressing bass response—you can drastically improve the sound quality in your home studio or listening space. Start with these basic steps, and you’ll notice a significant improvement in your recordings.
Remember, acoustic treatment doesn’t have to be complex or expensive. With a little planning and the right tools, you can create a space that brings out the best in your music. If you still thinking about it, hiring a professional can be a good solution for you.