
This Post may contain affiliate links, when you purchase through links on our site, we may earn an affiliate commission at no extra cost to you. Here’s how it works.
Build DIY Acoustic Panels for Your Band Room or Home Studio and improve the sound quality without breaking the bank.
Table of Contents
ToggleYou don’t need to buy expensive foam panels or fancy sound treatment products—just some basic materials, a little effort, and a few simple tools are enough to build efficient DIY Acoustic Panels.
Why You Need DIY Acoustic Panels
Most of us are familiar with the pyramid-shaped foam, that might look cool but doesn’t absorb sound effectively. The problem is that many cheap foam panels lack the necessary mass and density to absorb mid and high-frequency reflections.
Proper acoustic panels, on the other hand, are designed to absorb sound across a broader frequency range. These DIY panels control reflections, reduce reverb, and create a cleaner, more focused sound environment in your home studio or band room.
Required Materials & Tools:
To build your DIY acoustic panels, here’s a quick list of essential materials:
- Fiberglass Insulation or Rockwool (Mineral Wool): 2-4 inches thick, with 2 inches being ideal for most home applications.
- Wood for the Frame: Softwood like pine or fir (1×3 or 1×4 lumber). For a 2′ x 4′ panel, you’ll need four pieces: two vertical and two horizontal.
- Acoustically Transparent Fabric: Choose breathable fabrics like burlap, polyester, or muslin to allow sound through. Ensure enough fabric to cover the front and wrap around the edges (add 4-6 extra inches on all sides).
- Staples and Staple Gun: Heavy-duty staple gun to secure the fabric to the frame.
- Screws or Nails: To assemble the wooden frame. Screws are preferred for strength, especially if you’ll be hanging the panels.
- Tools:
- Measuring Tape: For accurate measurements.
- Saw: Hand or power saw to cut the wood.
- Drill and Screwdriver: This is used to assemble the frame.
- Safety Gear: Gloves, goggles, and a dust mask for working with insulation.
- Scissors: To cut fabrics.
- Optional: Corner brackets for extra frame reinforcement.
Step-by-Step Guide to Build DIY Acoustic Panels
If you think that this is hard to build, don’t worry. Following our provided steps, you can easily make a close-to-perfect DIY Acoustic Panel.
Step 1: Cutting the Wood for the Frame
The first task is to measure and cut the wood pieces that will form the outer frame of the panel.
- Determine Panel Size: Common sizes are 2’ x 4’ or 2’ x 2’. You can adjust the dimensions depending on the space available and your acoustic needs. The most popular size is 2’ x 4’ for wall-mounted panels.
- Cut the Wood: Measure the wood accurately, and then cut the boards for the length and width of your frame. A typical 2’ x 4’ panel will require:
- Two vertical pieces (2 feet long)
- Two horizontal pieces (4 feet long)
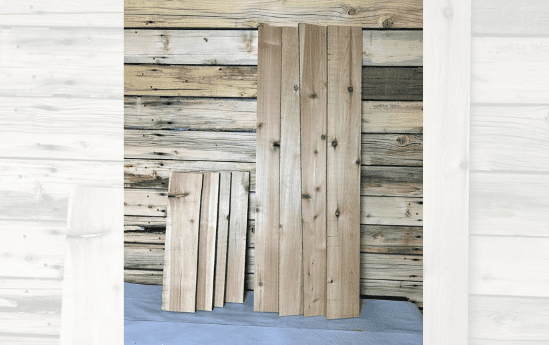
- Cutting the Wood: Use a saw to cut the boards to the correct length. If you don’t own a saw, many hardware stores will cut the wood for you at no extra charge.
Tip: Ensure that the cuts are as straight as possible. This helps the frame fit together properly and ensures a professional finish.
Step 2: Assembling the Frame
Now that you have your wood pieces, it’s time to assemble the frame.
- Join the Pieces: Lay the pieces on a flat surface and form a rectangle by attaching the horizontal and vertical pieces.
- Screws vs. Nails: Using screws is recommended for a stronger hold. Pre-drill pilot holes in the wood to avoid splitting the wood when screwing the pieces together. You can also use wood glue for extra strength, though screws alone will suffice.
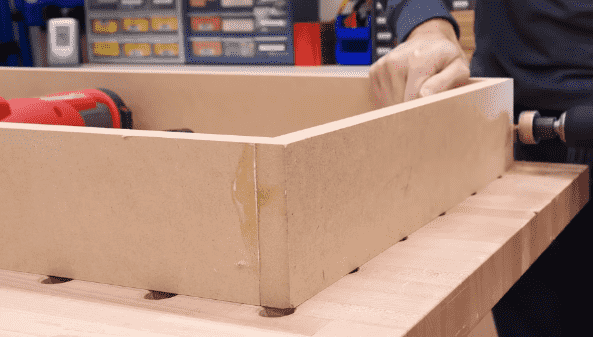
- Reinforce the Corners: For added durability, consider using corner brackets at the frame. This is optional but provides extra stability, especially for larger panels.
Tip: Make sure the frame is square by measuring the diagonals. Both diagonal measurements should be equal. If it is possible you can use a corner measuring tool.
Step 3: Cutting and Attaching the Insulation
Once the frame is assembled, it’s time to prepare the insulation.
- Wear Protective Gear: When handling fiberglass, wear gloves, a dust mask, and goggles. Fiberglass particles can be irritating to your skin, eyes, and lungs.
- Cut the Insulation: Take the fiberglass or mineral wool insulation and cut it after measure perfectly. If it’s too tight, it might be not easy to insert, but it will help keep the material in place once assembled.
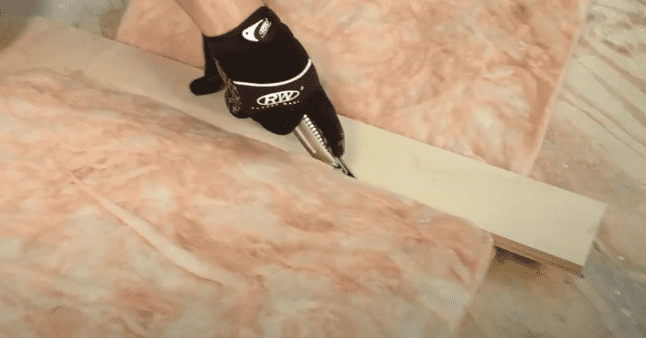
- Fit the Insulation: Place the insulation inside the wooden frame. You may need to compress it slightly if it’s slightly oversized. It should fit tightly enough to stay in place but not be so tight that it damages the insulation.
Tip: Avoid using overly thin insulation (less than 2 inches thick), as it won’t absorb low-frequency sound as well.
Step 4: Wrapping the Frame with Fabric
Now that the frame and insulation are ready, it’s time to add the fabric covering.
- Cut the Fabric: Cut a piece of fabric that is large enough to wrap around the front, sides, and edges of the frame. Be sure to leave extra fabric around the edges—at least 4-6 inches on each side—to allow for a clean wrap.
- Stretch the Fabric: Start by stapling the fabric to the center of one side of the frame. Then, pull the fabric tightly over the insulation, stapling the fabric to the opposite side. Repeat this process for the other two sides.
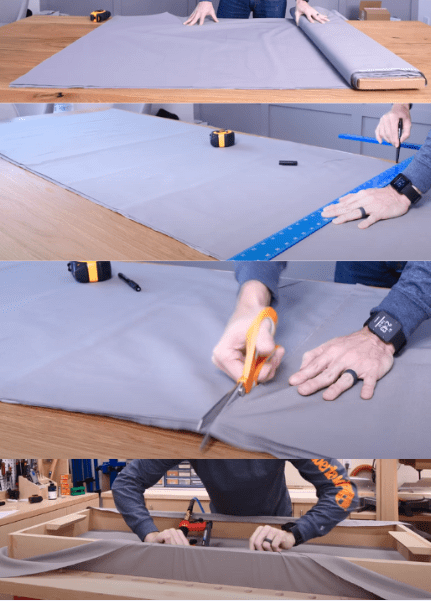
- Fold the Corners Neatly: For a professional finish, fold the fabric at the corners like you would wrap a present, and staple the edges securely. The fabric should be smooth and taut, with no wrinkles.
Tip: Make sure the fabric is acoustically transparent. Some fabrics, like thick velvets, can block sound waves and reduce the panel’s effectiveness.
Step 5: Add Hanging Hooks
To get the best absorption, you want to hang your panels slightly away from the wall.
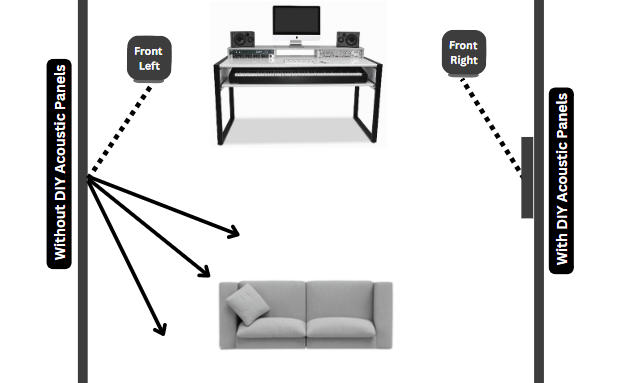
- Wall Placement: For optimal acoustic treatment, place your panels at the first reflection points along the walls.
- Attach Hooks: Screw in picture frame hangers or round steel eyes on the top of the frame. Pre-drill the holes to avoid splitting the wood.
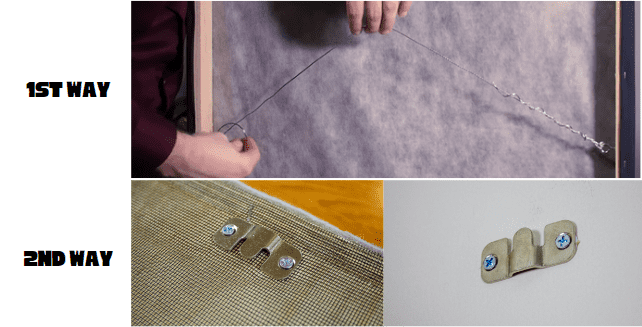
- Mount the Panels: Use a spirit level and measuring tape to position the panels on the wall. Leave a small gap between the panel and the wall to allow sound to pass through the fabric and reflect off the wall.
Tip: Experiment with the placement of the panels by testing the sound in the room. Sometimes, adjusting the placement of the panels a few inches can make a noticeable difference.
Bass Traps: If you need to treat corners for bass frequencies, consider creating triangular or corner-shaped panels to act as bass traps.
Build DIY acoustic panels in Large Quantities.
For this, you may not be enough to do it single-handedly. If you want to build dozens of quantities at once, it may take several days. You have to do smart work while building DIY acoustic panels in Large Quantities.
Calculate (add a few extra materials) the materials required according to the number of DIY acoustic panels. Quantities. Now hire a semi-professional Carpenter at a low cost.
They can make this work easy for you and it is also worth you. Also, make sure the Carpenter understands your plan. If you want to build 10 or 12 DIY acoustic panels in different shapes, this can be the easiest and quickest way to complete them.
Conclusion:
Building your own DIY acoustic panels doesn’t require advanced skills or expensive materials. With a little time and effort, you can create a sound-treated room that will drastically improve your recordings, rehearsals, and listening experience. It’s good to build one or two DIY acoustic panels but when it comes to a dozen you may need to hire a professional carpenter.
By using quality materials, following the steps carefully, and adding a personal touch, you can transform your home studio into a space that sounds great and looks awesome. If you still have any question related this issue, comment below.